
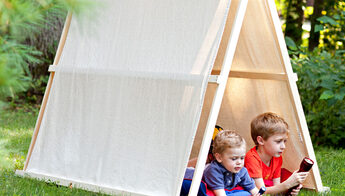
Here is an awesome tent idea that would be great for your little ones to share with their 4-legged friends in the backyard. It will be their little hide-away.
Tools
- Drill
- Countersinking pilot bit for #8 screws
- 3/8" drill bit
- Framing square
- Tape measure
- Staple gun
- Wood glue
Materials
- 12 - 1"x2"x6' boards
- #8x1-1/4" wood screws
- 2 - 3/8" wing nuts
- 2 - 3/8" flat washers
- 2 - 3/8"x2" hex bolts
- 6'x9' canvas drop cloth
Step 1
Wash and dry the drop cloth to soften it. (Avoid hot settings on the washer or dryer that may cause excessive shrinkage.) Sand the faces, edges, and ends of each 1"x2"x6' board to remove any sharp edges or rough spots.
Step 2
Find the four straightest boards to use as the vertical ends (A) for both frames. Measure 20-1/2" down from the top end of each board and mark the center of the 1-1/2"-wide faces where shown. Drill 3/8" holes at each mark, taking care to keep the holes 90 degrees to the wood surface.
Step 3
On a flat surface, place two of the vertical ends (A) on edge so they're parallel and about 6' apart. Check that the 3/8" holes are at the top end. Lay cross brace (B) with the face spanning the two parallel boards and flush with their ends. Use a carpenter's square to check that they're 90 degrees to each other. Drill two countersunk pilot holes about 3/8" from the edges of the top board. Then add glue and screw the top board to the two vertical boardsStep 4
Measure 23" from the edge of the bottom board and mark the two vertical boards. Glue, drill, and screw a second horizontal board in place. Measure another 23" and repeat to add a third horizontal board to complete one tent frame side. Repeat the previous step and this one to make a second side; let the glue dry.
Step 5
To join the frames, stand them together with the holes overlapping. Place a washer on a 3/8"x2" hex bolt, slide the bolt through the holes, and hold it in place with another washer and a wing nut. Repeat for the other hole.Step 6
Spread the two sides apart to form the "A" shape. Drape the prewashed drop cloth over the frame and confirm that it will reach from one bottom board to the other. Then staple one end to the bottom board on one side, pulling it tight as you go. Pull the cloth tight over the top and staple it to the opposite bottom board. Lightly hammer any staples not completely driven in place.
Step 7
Drill and screw (but don't glue) a reinforcement (C) on top of the stapled bottom board (B) to create a clean look and keep any staples from popping loose. Repeat for the other side.
Visit my new blog at http://petpagesplus.wordpress.com
Here you will see more articles, posts, pictures, products, product reviews, news, updates and so much more.
Opinions from my blogger friends